
Your First Automated Exit with LaserSell
A step by step walkthrough from install to your first automated sell. See exactly what happens when LaserSell fires an exit for you.
LaserSell is a passive exit engine that runs in the background. You start it before you trade, then buy or create tokens on whatever platform you already use. LaserSell watches your wallet, tracks PnL in real time, and fires the sell automatically when your strategy conditions are met. You trade. It exits.
This post walks through the full loop: install, setup, buy a token, and watch LaserSell fire your first automated exit.
Why Automate Your Exits
Most traders lose money not on entries, but on exits. They hold too long, panic sell the bottom, or miss the window entirely. LaserSell removes you from the equation at the moment it matters most.
| Benefit | Why it matters |
|---|---|
| Millisecond execution | Reacts faster than any human during a pump or liquidity drain |
| Prevent total loss | Enforces your exit strategy every time so no position rides to zero |
| Consistent across every position | Every position gets the same disciplined exit, no exceptions |
| No emotional interference | Follows your rules without hope, fear, or hesitation |
| Focus on entries | Stop babysitting charts, LaserSell handles the sell side |
| Self custody | Runs locally, keys never leave your machine, encrypted at rest |
Before You Start
You will need two things before running the setup wizard:
- A private RPC endpoint. We recommend signing up for a free tier from Helius, Shyft, or Chainstack. A private RPC gives you faster balance updates and more reliable transaction confirmations than the public Solana RPC.
- A LaserSell API key. Sign up at app.lasersell.io to create one. The free tier is enough for most users.
Step 1: Install and Setup
Install with one command:
curl -fsSL https://dl.lasersell.io/install.sh | bash
Run lasersell to start the setup wizard. It asks for your RPC URL, API key, strategy settings, wallet, and a passphrase to encrypt your keystore. Configure your exit conditions based on your trading style. You can always tune them later from the TUI.
lasersell
Run a quick health check to confirm everything is connected:
lasersell --smoke
You should see SMOKE OK. For a detailed walkthrough of every prompt in the wizard, see the Initial Setup guide.
Step 2: Understand the TUI
When LaserSell starts, you see the Terminal UI.
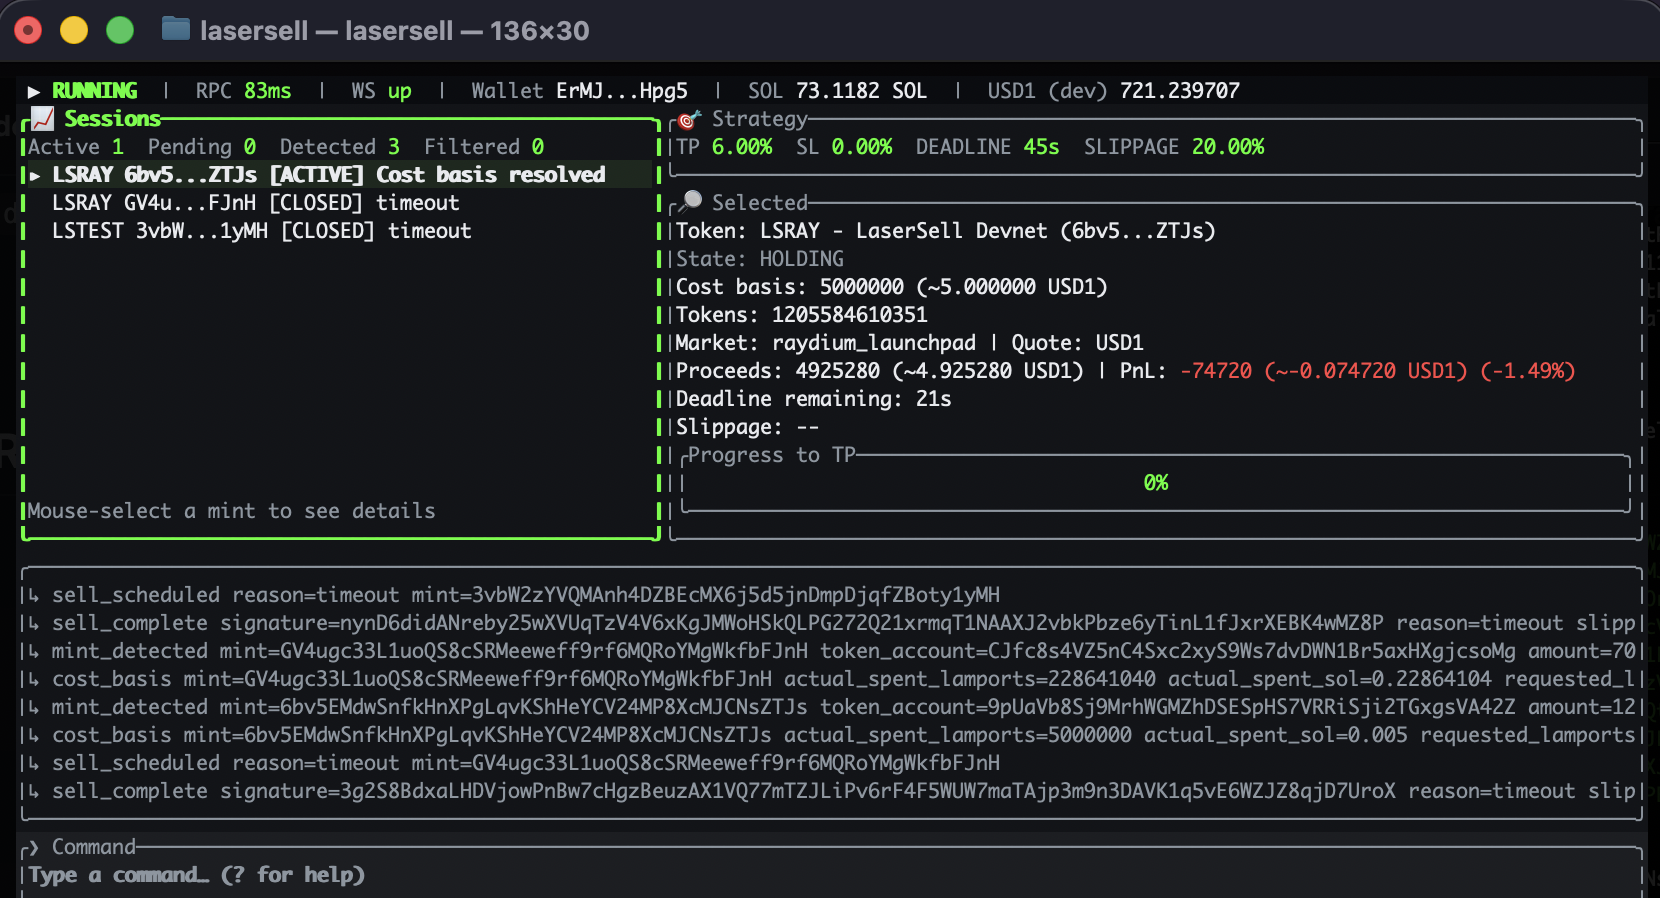
Here is what each area shows:
| Area | What it shows |
|---|---|
| Header | Running/paused status, RPC latency, WebSocket health, wallet address, SOL and USD1 balances |
| Sessions (left pane) | Every token LaserSell has detected, with current status |
| Strategy (top right) | Your active exit settings: TP, SL, TS, deadline, slippage, graduation |
| Selected (middle right) | Details for the highlighted token: cost basis, current value, PnL, proceeds |
| Output (bottom right) | Command responses and log events |
| Command (bottom bar) | Type commands here |
The Sessions pane will be blank until LaserSell detects tokens in your wallet. That is normal. Press Tab to switch focus between the Sessions pane and the Command bar.
Key statuses
Positions move through these statuses in order:
- DETECTED — LaserSell sees a new token in your wallet
- ACTIVE — Position is being tracked with live PnL
- SELL SCHED — An exit condition fired and the sell is queued
- SELLING — The sell transaction is in flight
- CLOSED — Sold. Final proceeds are shown in the Selected panel.
If something goes wrong, you may see ERROR (failed to sell) or FILTERED (token was rejected by your filters).
Step 3: Buy a Token
Use whatever platform you already trade on. Photon, BullX, Phantom, Jupiter, or anything else that interacts with your wallet. LaserSell does not care where the buy comes from. It monitors on-chain activity directly.
Within milliseconds of your buy reaching processed status on-chain, the token appears in the Sessions pane. Start with a small position so you can watch the mechanics play out without risking real capital.
Step 4: Watch the Exit Fire
Once the position is ACTIVE, LaserSell tracks PnL on every price update. Press Tab and select the position in the Sessions pane to see live details in the Selected panel: cost basis, current value, unrealized profit or loss.
When a condition triggers, say your take profit threshold, you will see it happen in real time:
- The Output panel logs the exit event (e.g. "TP triggered")
- The status moves to
SELL SCHED - LaserSell builds and signs the sell transaction
- Status moves to
SELLINGas the transaction lands - Status moves to
CLOSEDwith final proceeds shown in the Selected panel
The entire sequence from trigger to sell typically completes in under a second. That is the core promise: you never have to watch a chart, decide when to sell, or panic during a dump. LaserSell handles it.
Step 5: Tune Your Strategy
You chose your strategy during setup. Here is what each setting controls:
| Setting | What it does |
|---|---|
| Take Profit | Sell when profit reaches your target % |
| Stop Loss | Sell when loss reaches your threshold % |
| Trailing Stop | Sell when profit drops a set % from its peak |
| Deadline | Force sell after N seconds |
| Graduation | Sell when token migrates to a new DEX |
You can change any setting live from the TUI command bar. Changes apply immediately and are saved to your config file:
set tp 10%        # take profit
set sl 5%         # stop loss
set ts 3%         # trailing stop
set timeout 120   # deadline in seconds
set graduation on # sell on graduation
There is no universal best configuration. The examples above are for illustration only and are not an official trading strategy. The right settings depend on how you trade, what kinds of tokens you target, and how much risk you are comfortable with.
For the full list of commands and keyboard shortcuts, see LaserSell UI. For a deeper look at how exit strategies interact, read Escaping a Rug Pull.
Running Headless
If you are running LaserSell on a VPS or server where you do not need the TUI, use the --no-tui flag:
lasersell --no-tui
All exit logic works identically without the TUI. Positions are still detected, tracked, and sold automatically.
To skip the interactive passphrase prompt on startup, set the LASERSELL_WALLET_PASSPHRASE environment variable:
export LASERSELL_WALLET_PASSPHRASE="your-passphrase"
lasersell --no-tui
This is useful for systemd services, Docker containers, or any unattended deployment.
Wrap Up
LaserSell removes the emotional decision from selling. You set your rules once, buy tokens the way you already do, and let the engine handle every exit. No chart watching, no panic selling, no "I should have sold earlier."
Install it, run through the loop described above, and tune from there.
Resources:
- Quickstart — Install and run in under 5 minutes
- LaserSell UI — Full TUI command reference
- Escaping a Rug Pull — Deep dive on exit strategies
- Discord — Ask questions and share your setups
- GitHub — Open source, MIT licensed